Friday, 31 August 2018

Road vehicles Brake linings frictions materials Visual inspection ISO PAS 22574

Road vehicles — Brake linings frictions
materials — Visual inspection
ISO/PAS
22574

 Scope
Friction linings are composite materials with complex structure. Due to their composition and their production process, visual appearance characteristics can occur which in a precisely defined design are to be regarded as specific to the product. This International Standard defines visual aspect for the identification and assessment of such product characteristics in quality assurance, as well as a basis for commercial and technical agreements. The sequence of the product characteristics represents no order of priority. The brake linings are inspected in the “as supplied” condition, meaning unused. In some characteristic features, there are differences between brake linings with an effective lining pad surface < 120 cm² and W 120 cm². The acceptance criteria within the International Standard do not allow any characteristics which could impair the function and performance of brake linings and are applied unless there are other agreements between the customer and the supplier.


Labels:

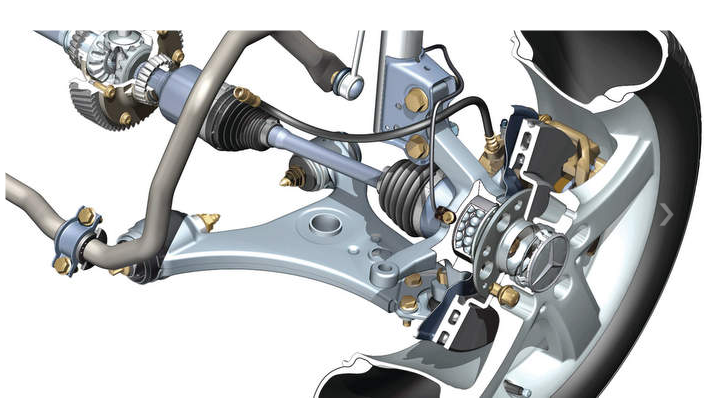
Rotor with hub and bearing diagrams

Rotor with hub and bearing diagrams


Labels:

Introduction To Wheel Bearings Types and Installation

Introduction To Wheel Bearings  Types and Installation 

Introduction
Many different types of bearings are used in the automobile. A bearing may be defined as a component that supports and guides one of these parts:
1. Pivot
2. Wheel
3. Rotating shaft
4. Oscillating shaft
5. Sliding shaft
While a bearing is supporting and guiding one of these components, the bearing is designed to reduce friction and support the load applied by the component and related assemblies. Since the bearing reduces friction, it also decreases the power required to rotate or move the component. Bearings are precision-machined assemblies, which provide smooth operation and long life. When bearings are properly installed and maintained, bearing failure is rare.

Bearing Loads
When a bearing load is applied in a vertical direction on a horizontal shaft, it is called a  radial bearing load . If the vehicle weight is applied straight downward on a bearing, this weight
is a radial load on the bearing. A  thrust bearing load  is applied in a horizontal direction
(Figure 1). For example, while a vehicle is turning a corner, horizontal force is applied to the
front wheel bearings. When an  angular bearing load  is applied, the angle of the applied load  is somewhere between the horizontal and vertical positions.

FIG 1

Bearing Types
Ball Bearings
Front and rear wheel bearings may be  ball bearings or roller bearings. Either type of bearing contains these basic parts:
 1. Inner race, or cone
 2. Rolling elements, balls, or rollers
 3. Separator, also called a cage or retainer
 4. Outer race, or cup
A single-row ball bearing has a crescent-shaped machined surface in the inner and  outer races in which the balls are mounted (Figure 2). When a ball bearing is at rest,  the load is distributed equally through the balls and races in the contact area. When one  of the races and the balls begin to rotate, the bearing load causes the metal in the race  to bulge out in front of the ball and  flatten out behind the ball .this action  creates a certain amount of friction within the bearing, and the same action is repeated  for each ball while the bearing is rotating. If metal-to-metal contact is allowed between
the balls and the races, these components will experience very fast wear. therefore, bearing lubrication is extremely important to eliminate metal-to-metal contact in the bearing  and reduce wear.
FIG 2
Double-row ball bearings contain two rows of balls side by side. As in the single-row  ball bearing, the balls in the double-row bearing are mounted in crescent-shaped grooves in  the inner and outer races. the double-row ball bearing can support heavy radial loads and withstand thrust loads in either direction.
Some rear axle bearings on rear-wheel drive cars are sealed on both sides and retained on the axle with a retainer ring figure 3
FIG 3
Tapered Roller Bearing
In a tapered roller bearing , the inner and outer races are cone shaped. If imaginary lines  extend through the inner and outer races, these lines taper and eventually meet at a point  extended through the center of the bearing (Figure 4). the most important advantage  of the tapered roller bearing compared to other bearings is an excellent capability to carry  radial, thrust, and angular loads. In the tapered roller bearing, the rollers are mounted on  cone-shaped precision surfaces in the outer and inner races. the bearing separator has an  open space over each roller. Grooves cut in the side of the separator roller  openings match the curvature of the roller. this design allows the rollers to rotate evenly  without interference between the rollers and the separator. Lubrication and proper endplay
adjustment are critical on tapered roller bearings. A tapered roller bearing may be called a  cup and cone.
FIG 4
Needle Roller Bearings
A needle roller bearing contains many small-diameter steel rollers in a thin outer race.  this type of bearing is very compact, and it is used in steering gears where mounting space is  limited. Most needle roller bearings do not have a separator, but the steel rollers push against  each other and maintain the roller position. Rather than having an inner race, a machined  surface on the mounting shaft contacts the inner surface of the rollers (Figure 5). the needle roller bearing is designed to carry radial loads; it does not withstand thrust loads.
FIG 5
Wheel Bearings
Some front-wheel-drive vehicles have front wheel bearing and hub assemblies that are  bolted to the steering knuckles (Figure 6). the bearings are lubricated and sealed, and the complete bearing and hub assembly is replaced as a unit. the bearing hub unit is more compact than other types of wheel bearings mounted in the wheel hub. this type of bearing contains two rows of ball bearings with an angular contact angle of 32° . the inner bearing assembly bore is splined, and the inner ring extends to the outside to form a flange and spigot. the flange attached to the outer ring contains bolt holes, and bolts extend through these holes into the steering knuckle. this type of bearing attachment allows the bearing to become a structural member of the front suspension.
FIG 6

Since the bearing outer ring is self-supporting, the main concern in knuckle design is  fatigue strength rather than stifness. the drive axle shaft transmits torque to the inner  bearing race. this shaft is not designed to hold the bearing together. this type of wheel  bearing is designed for mid-sized front wheel-drive cars.
Each front drive axle has splines that fit into matching splines inside the bearing hubs  (Figure7). A hub nut secures the drive axle into the inner bearing race. Some wheel  bearing hubs contain a wheel speed sensor for the antilock brake system (ABS).
FIG 7

Some front-wheel-drive vehicles have a sealed bearing unit that is pressed into the steering knuckle (Figure 8). the wheel hub is pressed into the inner bearing race, and the drive  axle is splined into the hub. this type of bearing is designed for smaller front-wheel-drive  cars. these bearings may contain two rows of ball bearings, or two tapered roller bearings  and a split inner race (Figure 8). the bearing containing two tapered roller bearings has  more radial load capacity than the double-row ball bearing. However, the tapered roller  bearing is more sensitive to misalignment. Both sides of the bearing are sealed, and a seal  is positioned behind the bearing in the steering knuckle to keep contaminants out of the bearing area.
FIG 8
Front Steering Knuckles with Two Separate Tapered Roller Bearings
Other front-wheel-drive vehicles have two separate tapered roller bearings mounted in the  steering knuckles.the bearing races are pressed into the steering knuckle, and seals are  located in the knuckle on the outboard side of each bearing (Figure 9). Correct bearing  endplay adjustment is supplied by the hub nut torque. the wheel hub is pressed into the inner bearing races, and the drive axle splines are meshed with matching splines in the wheel hub.
FIG 9

Wheel Hubs with Two Separate Tapered Roller Bearings
Many rear-wheel-drive cars have two tapered roller bearings in the front hubs that support the hubs and wheels on the spindles. this type of front wheel bearing has the bearing races  pressed into the hub. A grease seal is pressed into the inner end of the hub to prevent grease  leaks and keep contaminants out of the bearings. the hub and bearing assemblies are retained  on the spindle with a washer, adjusting nut, nut lock, and cotter pin. the adjusting nut must be adjusted properly to provide the correct bearing endplay. A grease cap is pressed into the outer end of the hub to prevent bearing contamination (Figure 10).
FIG 10
Some front-wheel-drive cars have two tapered roller bearings in the rear wheel hubs that  are very similar to the front wheel bearings in Figure 10. the two tapered roller bearings in  the rear wheel of a front-wheel-drive car are shown (Figure 11).
FIG 11
Rear-Axle Bearings
On many rear-wheel-drive cars, the rear axles are supported by roller bearings mounted near  the outer ends of the axle housing. the outer bearing race is pressed into the housing, and a machined surface on the axle contacts the inner roller surface. A seal is mounted in the axle  housing on the outboard side of each bearing (Figure 12). this type of axle bearing is usually not sealed, and lubricant in the differential and rear axle housing provides axle bearing  lubrication. the seals prevent lubricant leaks from the outer ends of the axle housing and keep dirt out of the bearings.
Other rear-axle bearings on rear-wheel-drive vehicles have sealed roller bearings pressed onto the rear axles. these axle bearings are sealed on both sides, and an adapter ring is pressed onto the axle on the inboard side of the bearing (Figure 12). the outer bearing race is mounted in the rear axle housing with a light press fit and a seal is positioned in the housing on the inboard side of the bearing and adapter ring. A retainer plate is mounted between the bearing and the outer end of the axle. this retainer plate is bolted to the axle housing to retain the axle in the housing.
FIG 12
Summary
⧪ A bearing reduces friction, carries a load, and guides certain components such as pivots,  shafts, and wheels.
⧪ Radial bearing loads are applied in a vertical direction.
⧪ thrust bearing loads are applied in a horizontal direction.
⧪ Angular bearing loads are applied at an angle between the vertical and horizontal.
⧪ the inner bearing race is positioned at the center of the bearing and supports the rolling  elements.
⧪ the rolling elements in a bearing are positioned between the inner and outer races.
⧪ the bearing separator keeps the rolling elements evenly spaced.
⧪ the outer bearing race forms the outer ring on a bearing.
⧪A cylindrical ball bearing is designed primarily to withstand radial loads, but these bearings can handle a considerable thrust load.
⧪ A snapring can be mounted in a groove in the outer bearing race, and the snapring  retains the bearing in the housing.
⧪ A bearing shield prevents dirt from entering the bearing, but it is not designed to keep lubricant in the bearing.
⧪ Bearing seals keep lubricant in the bearing and prevent dirt from entering the bearing.
⧪ Roller bearings are designed primarily to carry radial loads, but they can handle some thrust loads.
⧪ Tapered roller bearings have excellent radial, thrust, and angular load-carrying capabilities.
⧪ Needle roller bearings are very compact and are designed to carry radial loads. they will not carry thrust loads.
⧪ Springless seals are used for wheel bearing seals in some wheel hubs.
⧪ the garter spring provides additional force on the seal lip to compensate for lip wear, shaft movement, and bore eccentricity.
⧪ Flutes on seal lips provide a pumping action to direct oil back into a housing.
⧪ Bearing hub units are compact compared to bearings that are mounted in the wheel hub. this compactness makes bearing hub units suitable for front-wheel-drive cars.
⧪ Some bearing hub units are bolted to the steering knuckle; other bearing hub units are pressed into the steering knuckle.
⧪ Some steering knuckles contain two separate tapered roller bearings.

⧪ Rear-axle bearings are mounted between the drive axles and the housing on rear-wheel-drive cars.

Labels:

Thursday, 30 August 2018

SSC Steam Surface Condenser Design Program H E I - ninth edition

SSC Steam Surface Condenser Design Program H E I - ninth edition

The intent of the SSC program is to automate the thermal design calculations as outlined in the ninth edition of the HEI Standards for Steam Surface Condensers.  It is not intended to replace the standard but to augment it.

It should be noted that, although every effort has been made to insure that this program provides accurate thermal calculations, it is no way implied, or warrantied, that theses results are the best, or only, results for a given set of input parameters.

his program assumes the user to be familiar with the operation of the Windows operating system (Windows 3.11 or Windows 95).  In addition, the user should be familiar with the basic thermal design methodology of Surface Condensers.

The program has two modes of operation; "design" and "rating".  The "design" mode is used to determine the physical requirements of the condenser while the "rating" mode is used to determine performance of existing equipment under a specific operating load.

The program keeps the input data for each case in a data file that can be recalled later.  This allows the user to modify some of the parameters at a later time without having to reenter all the information.  Several sample input files are included in the distribution and it is recommended that the user review these samples in order to become familiar with the input requirements.


Labels:

Tuesday, 28 August 2018

VARDEX VERGUS TT Gen V2.01 Software Threading Solutions

VARDEX  VERGUS
TT Gen V2.01  Software
Threading Solutions

TT Gen V2.01 features
1) Working Method – defines Tooling.
2) 25 Thread Standards of thread shape define full & partial profile inserts.
3) Choose Pitch from list.
4) Choose thread designation or diameter pitch combination from list.
5) Conical threads diameters defined.
6) Material list defines suitable grades & cutting conditions.
7) List of ALL suitable Holders Inserts & spare parts is displayed to achieve right Helix angle.
8) Filter of tools solutions:
       a) Insert type – Partial, Full profile, All
       b) Insert Style - Standard, SCB, Red Line, Multi+, All
       c) Holder type – with cooling Channel, Without, All
       d) Holder Family – Standard, With Clamp, Slim throat, T, Z, M, U, Qualified, Miniature, Oil.

9)   Holder & Insert catalog Dimensions are displayed.
10) Infeed method recommendation is given.
11) Insert Grade with cutting conditions is offered.
12) Cutting Speed – alters RPM – Change in RPM alters Speed.
13) Depth of all passes is given.
14) Super finish pass is allowed – input of specific depth – does not change total depth of the passes.
15) Thread turning Summary report is output on screen.
16) Save of Report is possible as HTML file + directory or as Web Archive (*.mht ) to E-mail the summary.
17) Print of Report is possible.
18) VSX grade replaced by VTX. Default grade choice improved.
19) Improved Minimum bore diameter check of tools according to specified profile.
20) Local language possibility. Select 'Options' from main menu
      Press Radio Button according to desired  language
      (possible only at the first step of the TT Wizard)


Labels:

Monday, 27 August 2018

EXTERNAL MICROMETER CALIPER PARTS PHOTO

EXTERNAL MICROMETER CALIPER PARTS PHOTO

Labels:

MICROMETER READ EASILY Reading a Metric AND How to Read an Inch Micrometer


MICROMETER (READ EASILY)  ! LEARN AND GROW


Reading a Metric Micrometer.mp4

This video will explain how a metric micrometer is used by the mechanic to measure parts. Constructive criticism is good and helps with making the video better,


How to Read an Inch Micrometer

For ManufacturingET.orgA micrometer is used to make precise measurements. This video describes how to read a micrometer that is calibrated to read to the nearest thousandth of an inch.

Labels:

Using of The Micrometer Caliper and Applications

Using  of The Micrometer Caliper and Applications

introduction
Most engineering work has to be measured to much greater accuracy than it is possible to achieve with a rule, even when aided by the use of calipers. To achieve this greater precision, measuring equipment of greater accuracy and sensitivity has to be used. One of the most familiar measuring instruments used in engineering workshops is the micrometer caliper.

The constructional details 
The constructional details of a typical micrometer caliper are shown in figure 1
FIG 1
A   Spindle and anvil faces Glass hard and optically flat, also available with tungsten carbide faces
B   Spindle –Thread ground and made from alloy steel, hardened throughout, and stabilised
C   Locknut –Effective at any position. Spindle retained in perfect alignment
D   Barrel –Adjustable for zero setting. Accurately divided and clearly marked, pearl chrome plated
E   Main nut –Length of thread ensures long working life
F   Screw adjusting nut –For effective adjustment of main nut
G  Thimble adjusting nut –Controls position of thimble
H  Ratchet –Ensures a constant measuring pressure
I   Thimble –Accurately divided and every graduation clearly numbered
J   Steel frame –Drop forged
K  Anvil end –Cutaway frame facilitates usage in narow slots

the principle of operation
The operation of this instrument depends upon the principle that the distance a nut moves along a screw is proportional to the number of revolutions made by the nut and the lead of the screw thread. Therefore by controlling the number of complete revolutions made by the nut and the fractions of a revolution made by a nut, the distance it moves along the screw can be accurately controlled. It does not matter whether the nut rotates on the screw or the screw rotates in the nut, the principle of
operation still holds good. In a micrometer caliper, the screw thread is rotated by the thimble
which has a scale that indicates the partial revolutions. The barrel of the instrument has a scale which indicates the ‘whole’ revolutions. In a standard metric micrometer caliper the screw has a lead of 0.5 millimetre and the thimble and barrel are graduated as in figure 2
FIG 2

Since the lead of the screw of a standard metric micrometer is 0.5 millimetre and the barrel divisions are 0.5 millimetre apart, one revolution of the thimble moves the thimble along the barrel a distance of one barrel division (0.5 mm). The barrel divisions are placed on alternate sides of the datum line for clarity. Further, since the thimble has 50 divisions and one revolution of the thimble equals 0.5 millimetre, then a movement of one thimble division equals: 0.5 millimetre/50 divisions = 0.01 millimetre.
FIG 3

Figure 3 shows the scales for a micrometer graduated in ‘inch’ units. The micrometer screw has 40 TPI (threads per inch), therefore the lead of the screw is 1/40 inch (0.025 inch). The barrel graduations are 1/10 inch subdivided into 4. Therefore each subdivision is 1/40 inch (0.025 inch)
and represents one revolution of the thimble. The thimble carries 25 graduations. Therefore one thimble graduation equals a movement of 0.025 inch/25 = 0.001 inch. This is one-thousandth part of an inch and is often referred to by engineers as a ‘thou’. Thus 0.015 inch could be referred to as 15 ‘thou’.
micrometer caliper reading
As in  figure 2  .A metric micrometer caliper reading is given by:
• The largest visible ‘whole’ millimetre graduation visible on the barrel, plus
• The next ‘half’ millimetre graduation, if this is visible, plus
• The thimble division coincident with the datum line.
Therefore the micrometer scales shown in Fig.2 read as follows:
                    9 ‘whole’ millimetres = 9.00
                         1 ‘half’ millimetre = 0.50
       48 hundredths of a millimetre = 0.48
                                                       = 9.98 mm 
As in  figure 3 . An inch micrometer reading is given by:
Therefore the micrometer scales shown in Fig. 3 read as follows:
                        3 tenths of an inch = 0.300
                      1 fortieth of an inch = 0.025
             23 thousandths of an inch = 0.023
                                                       = 0.348 inch
care of Micrometer caliper 
Unless a micrometer caliper is properly looked after it will soon lose its initial accuracy. To maintain this accuracy you should observe the following precautions:
• Wipe the work and the anvils of the micrometer clean before making a measurement.
• Do not use excessive measuring pressure, two ‘clicks’ of the ratchet are sufficient.
• Do not leave the anvil faces in contact when not in use.
• When machining, stop the machine before making a measurement. Attempting to make a measurement with the machine working can ruin the instrument and also lead to a serious accident. This rule applies to all measuring instruments and all machines.
Although easy to read and convenient to use, micrometer calipers have two disadvantages:
• A limited range of only 25 millimetres. Thus a range of micrometers is required, for example: 0–25 millimetres, 25–50 millimetres, 50–75 millimetres, and so on.
• Separate micrometers are required for internal and external measurements. The micrometer caliper so far described can be used only for external measurements.

further application
Internal micrometer
An internal micrometer is shown in Fig. 4. It is used for measuring bore diameters and slot widths from 50 millimetres to 210 millimetres.
For any one extension rod its measuring range is 20 millimetres. A range of extension rods in stepped lengths is provided in the case with the measuring head. It suffers from two important limitations.
• It cannot be used to measure small holes less than 50 millimetres diameter.
• It cannot be easily adjusted once it is in the hole and this affects the accuracy of contact ‘feel’ that can be obtained.
FIG 4
Micrometer cylinder gauge
Figure 5 shows the principle of the micrometer cylinder gauge. It is used for measuring the diameters of holes to a high degree of accuracy. It uses a micrometer-controlled wedge to expand three equi-spaced anvils until they touch the walls of the bore. Unfortunately it has only a limited measuring range and the range cannot be extended by the use of extension rods . A separate instrument has to be used for each range of hole sizes.
FIG 5
Depth micrometer
This is used for measuring the depth of holes and slots. You must take care when using a depth micrometer because its scales are reversed when compared with the familiar micrometer caliper. Also the measuring pressure tends to lift the micrometer off its seating. A depth micrometer is shown
in Fig. 6. The measuring range is 25 millimetres for any given rods. Typical rods give a range of 0 to 25 mm, 25 to 50 mm, 50 to 75 mm.
FIG 6
Some applications of a depth micrometer are shown in Fig. 7.
FIG 7

Labels:

Sunday, 26 August 2018

Android Application Of Mechanical Engineering Source Site MECHASOURCE 7739148

Android  Application
Of  Mechanical Engineering Source Site
MECHASOURCE  7739148

Description
mechanical information,s  source developed this apk product to let the engineers follow site upgrades like blogs , books, software's about all mechanical products turbines , fans , bolts , pumps ,compressors ....... etc


Labels:

CONTROL ENGINEERING: THEORY AND PRACTICE M. N. BANDYOPADHYAY

CONTROL ENGINEERING: THEORY AND PRACTICE
Author
M. N. BANDYOPADHYAY

This book offers a comprehensive introduction to the subject of control engineering. Both continuous- and discrete-time control systems are treated, although the emphasis is on continuous-time systems. A chapter each is devoted to in-depth analysis of non-linear control systems, control system components, and optimal control theory. The book also introduces students to the modern concepts of neural fuzzy and adaptive learning systems.


Labels:

Technical specifications for centrifugal pumps Class I BS EN ISO 9905

Technical
specifications for
centrifugal pumps —
Class I
BS EN ISO 9905:1998+A1:2011


Labels:

Saturday, 25 August 2018

Relation of Tolerance To Surface Finish


Relation of Tolerance To Surface Finish


Labels:

Facebook Has a Secret 'Trustworthiness Score' For Users

Facebook Has a Secret 'Trustworthiness Score' For Users

Facebook is introducing a new rating system for users that evaluates them on their trustworthiness, the Washington Post is reporting. The system is part of a broader effort to fight misinformation on the platform.
Facebook has long had a problem with fake and misleading stories on its platform, and the company has launched a number of initiatives to reduce the number of those stories. One of those is a feature that asks users to vote on how truthful certain news stories are. If a particular news story is reported as false by many people, Facebook employees will look at it and determine if that assessment is accurate.
But that process creates another problem: How do you tell if the users reporting news stories are themselves trustworthy? To solve this problem, Facebook created another metric that tracks how well a particular user’s assessment agrees with Facebook’s. If users report a story as fake when it’s actually true, their trustworthiness score will go down, and it will go up if they use the tool as intended.
It’s “not uncommon for people to tell us something is false simply because they disagree with the premise of a story or they’re intentionally trying to target a particular publisher,” said Facebook product manager Tessa Lyons to the Post.
The "trustworthiness score" is a hidden value only visible to Facebook’s team, and is a single number ranging from 0 to 1. Facebook says that this is just one of several metrics the company uses to evaluate reports from users.

              PM

Labels:

Dimensioning and Tolerancing ASME Y14.5M-1994

Dimensioning and
Tolerancing
ASME Y14.5M-1994

Additions, modifications, and clarification contained in this revision of ANSI Y 14.5M- 1982 are intendedt o improve national and internationals tandardizationa nd to harmonize the United States practices and methodology with the universal standards trend toward more efficient worldwide technical communication. Coordinating and integrating these techniques into and via computer graphics and other electronic data systems for design, manufacture, verification, and similar processes is also a prime objective. Incorporating this Standard as a vehicle to assist the United States’ active participation  and competitivenessin the world marketplacei s a major goal. The emergenceo f priorities on total quality management, world-class engineering, and emphasis on compatibility with the International Organization for Standardization (ISO) 9000 series of quality standardsh as had a significant influence in the work of the Y14.5 Subcommittee.
This revision was initiated immediately after the official release of ANSI Y14.5M- 1982 in December 1982 in response to deferred comments from that revision, new conceptual developments, new symbology, and international standards expansion. Twenty-three Subcommittee meetings and numerous working group meetings of the
ASME Y 14.5 Subcommittee were convened during the developmental period. The meetings were held in various cities around the United States. The Subcommittee’s work was coordinated as much as possible with other related ASME committees and other standard developing bodies that share a common purpose on dimensioning and tolerancing or related standards. Particularly close alliance and liaison were sought with the ASME B89 Committee on “Dimensional Metrology,” and new committees ASME Y14.5.1 on “Mathematical Definition of Y 14.5,” and ASME Y14.5.2 on “Certification of GD&T Professionals.


Labels:

Friday, 24 August 2018

ASM Handbook,Volume 1 properties and selection irons,steels,and high performance alloys

ASM Handbook,Volume 1
properties and selection
irons,steels,and high performance alloys

During the past decade, tremendous advances have taken place in the field of materials science. Rapid technological growth and development of composite materials, plastics, and ceramics combined with continued improvements in ferrous and nonferrous metals have made materials selection one of the most challenging endeavors for engineers. Yet the process of selection of materials has also evolved. No longer is a mere recitation of specifications, compositions, and properties adequate when dealing with this complex operation. Instead, information is needed that explains the correlation among the processing, structures, and properties of materials as well as their areas of use. It is the aim of this volume⎯the first in the new 10th Edition series of Metals Handbook⎯to present such data.
Like the technology it documents, the Metals Handbook is also evolving. To be truly effective and valid as a reference work, each Edition of the Handbook must have its own identity. To merely repeat information, or to simply make superficial cosmetic changes, would be self-defeating. As such, utmost care and thought were brought to the task of planning the 10th Edition by both the ASM Handbook Committee and the Editorial Staff.
To ensure that the 10th Edition continued the tradition of quality associated with the Handbook, it was agreed that it was necessary to:
• Determine which subjects (articles) not included in previous Handbooks needed to be added to the 10th Edition
• Determine which previously published articles needed only to be revised and/or expanded
• Determine which previously published articles needed to be completely rewritten
• Determine which areas needed to be de-emphasized
• Identify and eliminate obsolete data


Labels:

SolidWorks 2014 Tutorials Interface, Add ins, New Part, Options , Units

SolidWorks 2014 TutorialS: Interface, Add ins, New Part, Options , Units


Hello & Welcome to SolidWorks Tutorial Channel This channel is dealing with EVERYTHING about SolidWorks aims to make the viewer a professional SolidWorks user! & to be helpful!
This Channel contains topics about: - SolidWorks Beginners Tutorials - SolidWorks Sketch - SolidWorks Surface - SolidWorks Motion - SolidWorks Weldments - SolidWorks Mold Design - SolidWorks Simulation And MORE


Labels:

Rubber and plastics hoses and hose assemblies Guidelines for selection, storage, use and maintenance ISO 8331 2016

Rubber and plastics hoses and
hose assemblies — Guidelines
for selection, storage, use and
maintenance (ISO 8331:2016)

This document sets out recommendations designed to maintain rubber and plastics hoses and hose
assemblies, prior to use, in a condition as close as possible to the condition they were in when they were received and to obtain the expected service life.


Labels:

Low scale reheating of semi-finished metal products in furnaces with recuperative burners

Low scale reheating of semi-finished metal products in furnaces with recuperative burners


Highlights
• Low scale reheating of copper and steel products applying fuel rich combustion.
• Post-combustion and heat transfer in recuperative burners.
• Low NOX emissions due to fuel rich combustion and post-combustion.
• Cost reduction for reheating of high-priced metal products.
Currently, direct gas fired reheating furnaces are most popular for heating slabs or billets prior for hot working. Additionally, industrial furnaces for reheating semi-finished metal products involve the same. As a consequence, oxidation of the metals exposed to the furnace atmosphere, by excess oxygen, carbon dioxide and vapor is inescapable. This oxidation has been seen to cause significant material loss and additional work during furnace operation and in further processing. To counteract this, researchers have previously attempted various reheating treatment options such as heating with fuel rich combustion and recuperative burners. Unfortunately, most of this published work does not focus on the post-combustion of the off-gas or technical limits of the employed recuperative burner concept. Furthermore, there is minimal documentation regarding reheating concepts in furnaces.
Researchers at RWTH Aachen University in Germany: Christian Schwotzer, Matthias Schnitzler, and Herbert Pfeifer proposed a study to quantify scale reduction due to fuel rich combustion for different reheating processes. Moreover, they hoped to cross-examine the influence of fuel rich combustion and post-combustion on the thermal load and the off-gas emissions of the concept for recuperative burners and the economic implications compared to conventional reheating concepts with fuel lean combustion. To achieve this, they hoped to carry out a detailed study about the reheating of copper billets and steel in direct fired furnaces with recuperative burners. Their work is currently published in the research journal, Applied Thermal Engineering.
The researchers commenced their experiments by quantifying the mass change due to scale formation depending on the air ratio of the reheating process. Next, they investigated post-combustion in an annular gap to localize the maximum thermal load on the recuperator material and the off-gas emissions depending on the temperature of the off-gas and air. A comparison of the economic potential of the low scale reheating concept to that of a conventional reheating process with fuel lean combustion based on the costs for fuel and metal loss was then done.
The authors observed that at a constant primary and total air ratio, the maximum temperature in the post-combustion chamber depended on the temperature of the off-gas and the secondary combustion air. Moreover, it was noted that the maximum temperature in the annular gap was lower than the off-gas temperature at the inlet. In relation to the energy efficiency comparisons with conventional reheating concepts, it was seen that a lower total efficiency for the low scale reheating concept was recorded since for the conventional concept, the fuel does not get fully exploited in the primary combustion.

The RWTH Aachen University study successfully presented the examination of the concept for the reheating of copper and steel in furnaces with metallic and ceramic recuperative burners. The results here predict a positive impact on the technical applicability and economic significance of the concept for industrial furnaces with recuperative burners for the reheating of copper and steel. Altogether, the great potential for the low scale reheating concept for the reheating of steel if employed in industrial steel applications will guarantee increased productivity and profitability.

for more read from source RESEARCH PAPER

Labels: